

Hello and welcome back to Day 2 of our Reveal & Inspirational Chapter. Our new Fall Release is NOW AVAILABLE for Pre-Order at www.ppstamps.com! YAYYY!!!!! During this Pre-Order period, you will automatically receive a 16″ x 16″ FREE frosted zipper bag when you purchase our Stencils 360°™ Starter Kit! This frosted zipper bag is the perfect storage solution for your Stencils 360°™! So take advantage of this awesome deal which will only last until 17 Sep 11:30pm PST!

Visit our blog this week for some fun and awesome projects from myself and our talented Creative Team. Today we have 3 more stencils to showcase so let’s get to it! All of these work in conjunction with our Stencils 360°™. If you missed our Day 1 Intro, click HERE to read more about out this innovative tool or watch our Intro Video HERE!
First up for today is the Magical Fireworks Stencils 360°™. This set is great for creating greeting cards for various occasions! It contains two 6″ barrels. Use them separately or together! They also coordinates with the Warmest Wishes stamp set (to be showcased later this week), greeting orbs in which fit perfectly into the centre space of this stencil design!


Ashley made for us a trio of cards! She demonstrated perfectly how the stencils can be used together OR separately. I love that she chose different colours of cardstock to get the different themes. In these cards, she used various colours of Distress Oxide inks for blending.

For the 1:1 card, a piece of 4 3/4″ by 4 3/4″ cardstock was used for the blending, and both Barrels of the stencil set were used. I love the pink heat embossed image in the middle which is from our new Warmest Wishes stamp set.
For the tan-coloured card, a 4 1/4″ by 5 1/2″ panel of Neenah Desert Storm cardstock was used for the blending. She only used Barrel 2 of the stencil set this time and she chose a turning interval of 45°. This gives the card a nice clean composition. I love the gold shimmer on the kraft cardstock.

For the navy card below, a 4 1/4″ by 5 1/2″ panel of navy cardstock was used. This time she only took Barrel 1 and followed the recommended turning interval of 15° for blending. I love the gold ink she used for her stamped image. The sparkly embellishments finish off the card to perfection!

In the next example, I wanted to make a card that is full of colors and energy! I used both Barrels from this set.

I used a turning intervals of 22.5° with Barrel 1, and 30° with Barrel 2. These patterns form a fantastic overlay effect which I really like! The centre stamped image is from our new Warmest Wishes stamp set. This image fits perfectly in the centre space. I really love how this stencil mimics beautiful fireworks and hence where it got its name!

Next up is the Sacred Lotus Stencils 360°™. This set of stencils is the first of our Multi-Barrel™ series. This set comes in 3 pieces, comprising of two 8″ stencils and a 4″ stencil.
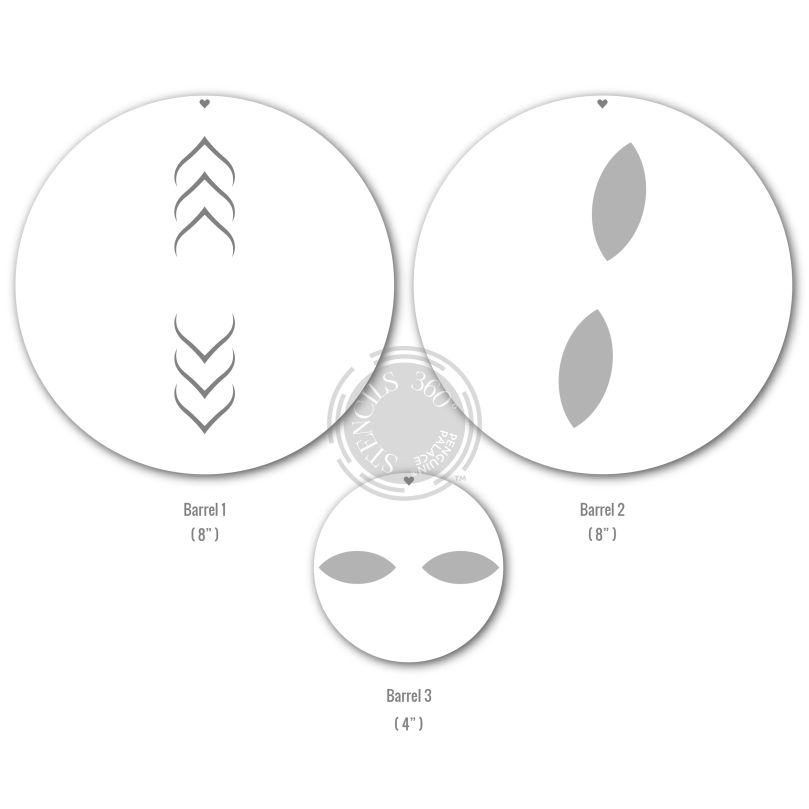
If you like floral designs, you will sure enjoy playing with this set! This set is super versatile as you can mix n’ match the barrels to get totally different looks!
First we have Anja’s pair of creations. She used Neenah Desert Storm cardstock for blending on both of her cards. Using Barrel 1, she chose a turning interval of 22.5° and ink blended alternating colors with Milled Lavender and Dusted Concord Distress Oxide Ink.

Then with Barrel 2, she blended alternating colors with Shaded Lilac and Dusted Concord Distress Oxide Ink, also with a turning interval of 22.5°. Finally, she ink blended Shaded Lilac on Barrel 3, again with the same turning interval.

I love her idea of cutting her card into 2 pieces to make 2 slimline cards – how clever! She used sentiments “Thinking of You” from Warmest Wishes and “Stay Strong” from Heartfelt Notes. I just love the bold white heat embossed letters.

In the next card, I blended Wilter Violet, Lucky Clover and Twisted Citron Distress Oxide Inks on our Essentials – Smooth Bright White 100lb. Heavy Weight Cardstock. I wanted to create a landscape format card, and so I only kept half of my design.

I used some scrap papers, Splendorlux Argento – Heavy Weight Premium Cardstock, & The Sandstone Series – Lavender Field – Premium Fine Paper to make a thick double border definition in between my stamped sentiment “My Deepest Gratitude” and the graphics. This bold sans-serif typeface is also from our new Heartfelt Notes stamp set.

On the inside of the card, I chose a scripty sentiment from our Words From the Heart (Chapter 2) stamp set.

For the last example featuring the Sacred Lotus Stencils 360°™, I combined Twisted Citron and Squeezed Lemonade on Barrel 1. I then used Shaded Lilac on Barrel 2, and Spun Sugar Barrel 3. I chose a turning interval of 22.5° for the whole of my blending process.

I thought this heart warming sentiment from Heartfelt Notes is a perfect match to this feminine card.

The final stencil we want to showcase today is the Origami Shuriken Stencils 360°™.
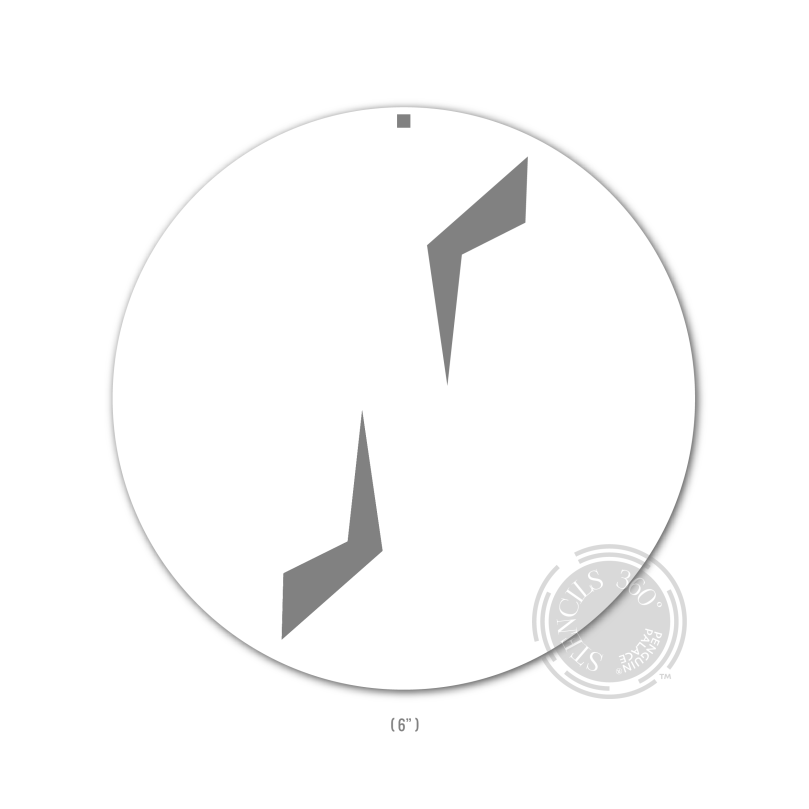
First we have Jo’s card. I just love how bright and vibrant this card is! She followed the alignment marker on this stencil and used a turning interval of 15°. I love how she used the bright yellow to create a beautiful ray of sunshine giving the card so much energy! The cyan blending at the back of this also pops up nicely!

Then she chose the sentiment “Hello Sunshine” from Words From The Heart (Chapter 2) stamp set and die cut it using its coordinating dies. She also stamped and colored some cute images from Summer Sunshine to complete her card! What a flawless combination – love it!


For this next card, I used a turning interval of 15°, ie. inking by making references to the ‘square’ symbols on The Base™. I chose a combination of 4 colors, and added an image from Warmest Wishes. Even though the blended shapes are spaced so closed together, not once did I need to do any masking for the multi-color blending. And it took me very little time to complete this card. I really love how it turned out.

On my next card will show you how the one stencil can offer different looks. I did a portrait orientation for this card instead of going 1:1. For this card, I increased the turning interval to 22.5° instead of using the recommended 15°. By doing this, I am actually making the geometric pattern less condensed.

I combined Twisted Citron and Squeezed Lemonade, and completed just 2 rounds of inking by first making reference to the solid hearts with one color, and then to the hollow ones with the other color. Super simple to do! I then added a shadow die cut “Never Lose Hope“, a stand-alone die which we will showcase a little later this week. Finally I used matching-color enamel dots to finish off this card.

For today’s final card I ink blended Wilted Violet and Spun Sugar. I thought our Sandstone Series – Precious Gem – Premium Fine Paper card base is a great addition to this color palette.

The centre stamped image is from the new Words From The Heart (Chapter 1) stamp set. I die cut this using the coordinating dies and adhered that with foam tape to finish off this clean and simple card.

That concludes our inspirations for today! I think you’ll agree that simple stencils make wonders! If you haven’t done so, head over to our Day 1 Intro and participate in our GIVEAWAY! In this Fall 2020 New Release & Inspirational Chapter, we are hosting 2 SEPARATE GIVEAWAYS, one on our Blog and the other on our Instagram page (@penguinpalacestamps)! We will randomly pick out FOUR lucky winners, two from IG and two from our blog, each will receive a $30CAD Gift Certificate to our shop!
You have until 12 Sep 9:00pm PST to enter. We really hope you will play along with us! Winners will be announced on our Blog and on Instagram on 13 Sep!
I hope you find today’s cards inspiring. Don’t forget to check out our Intro Video with step by step instructions on how to use our new Stencils 360°™!
We will continue to have lots of wonderful products and projects to showcase this week so be sure to visit us again! Thank you so much for stopping by. Have a lovely day!
Sharon for Penguin Palace
Supplies:


