Hi everyone, today Bobbi is back to share a duo of cards that are just simply amazing! She used eye-catching color combinations that give a modern and chic look!
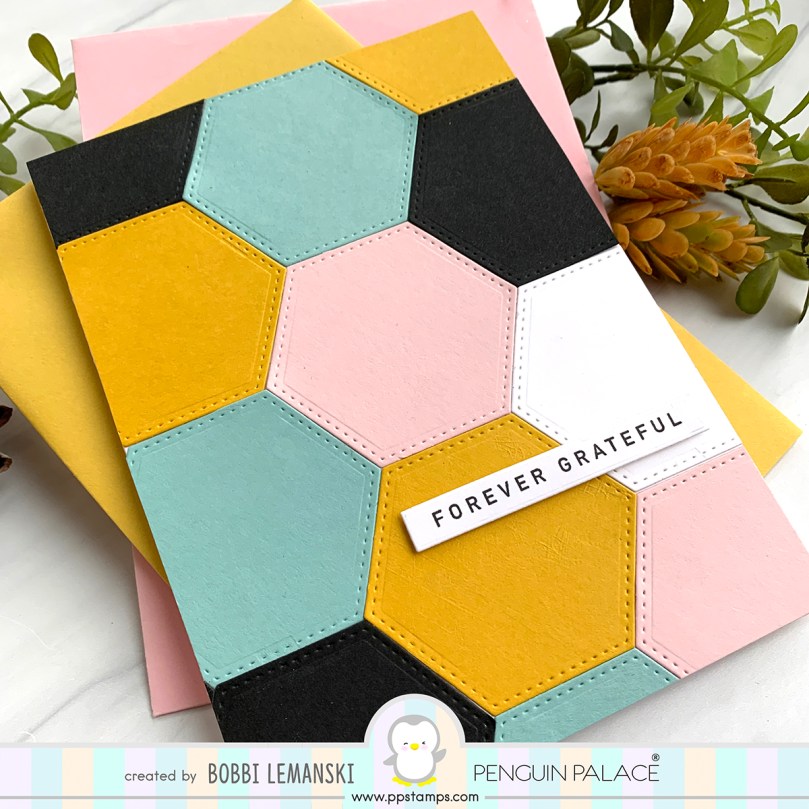
On this first card, she used the hexagon die from the the Warmest Wishes and Heartfelt Notes die set in the colors of gold, pink, a muted aqua and black. This color combination is so special and I love all the contrasts that they give!
She die cut all the stitched hexagons and adhered them to an A7 card base. I love the stitched detailing on these hexagons!
Inside the card, she used the Orbit Stencils 360°TM to create the interior panel. I just love how the colors coordinate with those at the front! She left some space in the middle where a note of thanks can be written across.
To complete this look, she stamped and cut the “Forever Grateful” sentiment from the Heartfelt Notes stamp set and attached it using a piece of narrow foam tape for the added dimension. I just love the elegant look on this card!
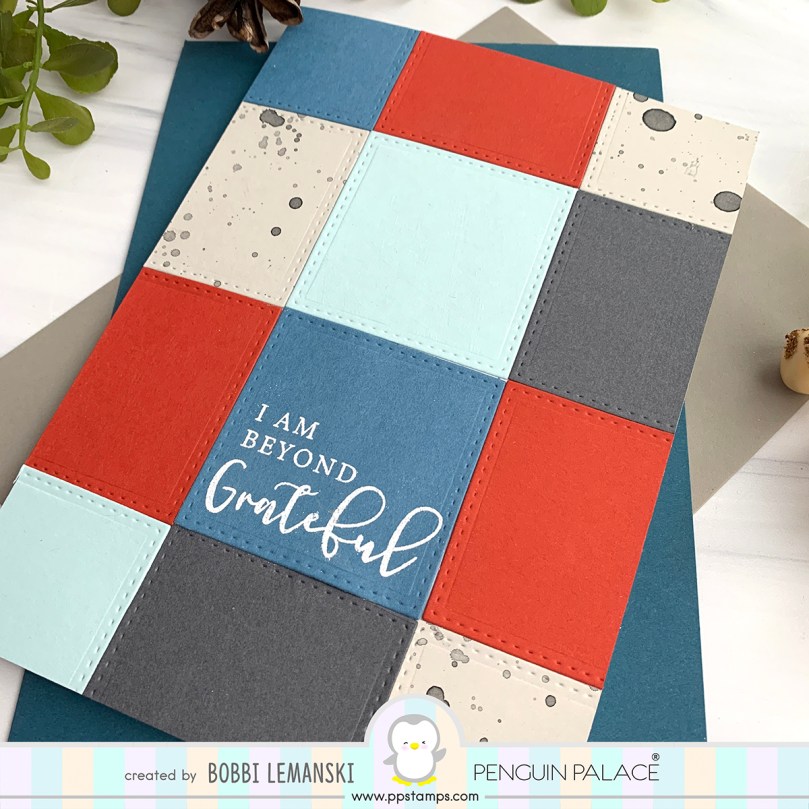
Her second card also measures 5″ X 7″, but this one has a more masculine feel due to the color choices. She used the stitched square die from the Warmest Wishes and Heartfelt Notes die set with a mixture of rust, earthy blue, a warm gray, a light aqua cardstock. I love that she added a light warm gray splattered with black watercolor.
I also love the white heat embossed sentiment on the darker color square in the lower centre which really pops! This sentiment “I’m Beyond Grateful” is from the Heartfelt Notes stamp set.
Inside the card, she used the Magical Fireworks Stencils 360°TM to create a coordinating look using the colors from the front. I love the clean and simple look of this!
This card would be an ideal gift for anyone! The sharp colors, stitched details and the bold and modern look are what make this card looking spectacular!
I hope you enjoyed today’s inspirations. Thanks for stopping by!
Hello and welcome back to Day 4 of our Reveal & Inspirational Chapter. Our new Fall Release is NOWAVAILABLE for Pre-Order at www.ppstamps.com! During this Pre-Order period, you will automatically receivea 16″ x 16″ FREE frosted zipper bag when you purchase our Stencils 360°™ Starter Kit! This frosted zipper bag is the perfect storage solution for your Stencils 360°™! So take advantage of this awesome deal which will only last until 17 Sep 11:30pm PST!
Get a FREE 16″x16″ Frosted Zipper Bag – During Pre-Order Period Only!
Today we have 2 more stencils and 4 new stamp sets & coordinating dies to showcase so let’s jump right in! All of the stencils work in conjunction with our Stencils 360°™. If you missed our Day 1 Intro, click HERE to read more about out this innovative tool or watch our Intro Video HERE!
Warmest Wishes and Heartfelt Notes – Coordinating Dies
Some of the dies can be mix and matched for different images in the sets, as you can see from the images below.
Words From The Heart (Chapter 1) 6″x8″ Clear Stamp SetWords From The Heart (Chapter 2) 6″x8″ Clear Stamp Set
The other 2 stamp sets Words From The Heart (Chapters 1 & 2) also shares a set of coordinating dies, as shown below. Read on to see how some of these images and dies were used in our projects!
Words From The Heart (Chapters 1 & 2) – Coordinating Dies
Here’s an example Bobbi made featuring one of the image from Heartfelt Notes. She used both Barrels from the Hello Sunshine Stencils 360°™ for this card.
I love the contrasting look between the outer ring of sunrays and the inner ring. These colors give a super warm and energetic vibes. I just love the bright and vibrant look.
The different sizes of die cut circles she used to decorate her card compliment the overall geometric pattern. Loving the white detailing she added.
One of the stencils that we want to showcase today is The Orbit Stencils 360°™. With this 8″ stencil, it is super easy to create 3-Dimensional graphics in minutes! You can easily mix and match sentiments and coordinating geometrical die cuts to achieve some interesting designs!
The Orbit Stencils 360°™
Since there is a “star” symbol as the alignment marker on this stencil, you can definitely try using different turning intervals for blending, in order to get different looks for your projects.
She used a combination of Faded Jeans, Blueprint Sketch and Speckled Egg Distress Oxide Ink on her stencil with a turning interval of 30°. The heat embossed sentiment is from Words From the Heart (Chapter 1). Loving the soft blue palette!
For my card below, I also used a turning interval of 30°. I chose 3 colors for my card namely Hickory Smoke, Twisted Citron, and Wilted Violet. As you may have noticed, I was going light-handed on this as I wanted to achieve a less opaque and more of a transparent look for my spheres.
For the next card, I combined Blueprint Sketch, Peacock Feathers, Cracked Pistachio and Squeezed Lemonade Distress Oxides. Unlike the above, I decreased the turning interval to 22.5°, making the pattern a little fuller with more layering.
I used a 1:1 format so that I can keep all of the graphics. The sentiment here is from Heartfelt Notes, and I die cut it using the hexagon coordinating die and adhered that with foam tape onto my blended card.
Jo made a Thanksgiving card that is full of autumn vibes. As you can see, the alignment marker on this stencil is a ‘pair’ of circles. Therefore in order to achieve the stencil’s intended design, you will need to rotate the stencil using a turning interval of 60° (as compared to a ‘single’ circle which represents a 30° interval).
I love embellishments that she added, so beautiful.
For my final card, I chose a smaller canvas, namely a 4 3/4” x 4 3/4” cardstock. In the past, blending multi-colors on a stencil design like this would require lots and lots of masking, but not anymore! Our Stencils 360°™ makes this colorful floral pattern super easy to create.
The image here in the centre is from Heartfelt Notes, I stamped the image using Cracked Pistachio Distress Oxide.
And that concludes our Fall 2020 Reveal and Inspiration Chapter!! I hope you had fun as much as we did. My goal for this release is to bring to the crafting community something unique and different. I really hope we’ve done that. If you like what you see, please help spread the word!
A warm reminder that today is your last chance to play along in our GIVEAWAY! In this Fall 2020 New Release & Inspirational Chapter, we are hosting 2 SEPARATE GIVEAWAYS, one on our Blog and the other on our Instagram page(@penguinpalacestamps)!We will randomly pick out FOUR lucky winners, two from IG and two from our blog, each will receive a $30CAD Gift Certificate to our shop!
You have until 12 Sep 9:00pm PST to enter. Tomorrow will be our Release Wrap Up and Winners Reveal! Thank you and come back soon!
Hello and welcome back to Day 3 of our Reveal & Inspirational Chapter. Our new Fall Release is NOWAVAILABLE for Pre-Order at www.ppstamps.com! YAYYY!!!!! During this Pre-Order period, you will automatically receivea 16″ x 16″ FREE frosted zipper bag when you purchase our Stencils 360°™ Starter Kit! This frosted zipper bag is the perfect storage solution for your Stencils 360°™! So take advantage of this awesome deal which will only last until 17 Sep 11:30pm PST!
Get a FREE 16″x16″ Frosted Zipper Bag – During Pre-Order Period Only!
Today we have 3 more stencils and 2 stand-alone dies to showcase so let’s get to it! All of these work in conjunction with our Stencils 360°™. If you missed our Day 1 Intro, click HERE to read more about out this innovative tool or watch our Intro Video HERE!
Pair them on a design or use them separately! This set creates a clean and simple look. It differs from the traditional sunray stencils as you can easily apply a combination of colors to the beams without having to do any masking! They are great for a variety of cards!
First we have our new team member Bobbi’s creation! Welcome to our Creative Team Bobbi! She chose Barrel 1 for her card, which creates ample space in the centre for lots of creativity!
She blended two shades of blue to get this gorgeous ray on the perimeter, creating a focal point in the centre where you’ll find our new stand-alone You Are My Inspiration Shadow Dies. I love the 3D visual effect she’d created here.
I just love the added bubbles and sequins that she added for the finished look, simply gorgeous!
Next we have a card that you may have seen during sneak peeks. I’ve used both Barrels for this card.
Here’s a quick clip on how I created this card. TIP: Sometimes the carved pattern on a 4″ stencil might be very close to the edge that you might find it easier to use just 2 small pieces of tape to secure your 4″ Guide Ring™ instead of using 4 (so that the tapes don’t get in your way of inking); or even not use any at all if that works for you, as I did in this video.
In the next example, I used a 6″ x 6″ canvas. I used a mixture of color palettes here to create a fun and vibrant look.
This stencil gives you great autumn vibes! First we have Ashley’s trio of cards!
She showcased perfectly how this stencil can look so different with different colors of cardstock. As per the alignment marker on the stencil, she rotated it using 60° turning intervals to complete the blended patterns.
On all of these cards, the entire stencilled panels were elevated from the card bases using a panel of foam, and the sentiments were elevated as well. This gives the cards the added dimension.
In the next example, I ink blended various colors of Versamark Chalk Ink on black cardstock using the Scents of Fall Stencils 360°™. I don’t use chalk ink much often but I really love how this turned out. For me, chalk ink works best on this stencil with a light dabbing motion.
I then adhered the card onto our Snow White – Heavy Weight Premium Cardstock. This cardstock is off-white filled with subtle watermarks that have a resemblance of raindrops, making it a unique looking cardstock.
This geometric pattern creates the best visual interest! I think this is an ideal background for some bright and bold designs. Perfect for all types of cards and even home decor!
In this first example, I used a wide turning interval of 60°. This creates a clean and less complex pattern, with just a little bit of overlap between the alternating colors. I used Shaded Lilac and Twisted Citron which is one of my favourite color palettes.
As you can see in the next example, I decreased the turning interval by half to 30°, while using 3 colors for blending. This makes the pattern much more complex and interesting, as there were more overlays.
I chose a sentiment from Heartfelt Notes, die cut it using on of the coordinating dies. Another piece was cut using the same die, but this time with kraft cardstock. I also rotated it by 30° before adhering that to the back of my stamped piece, to give it a little bit more texture to the card.
Finally I’d like to introduce to you our second stand-alone die in this release, it is called Never Lose Hope.
I showed a card yesterday where I used this die. Here’s a quick look at it again. In this one, I used both dies from the set.
In my final example below, the sentiment die from Never Lose Hope was used alone on some kraft cardstock, and I left the shadow out.
I blended Pine Needles, Wild Honey, Speckled Egg, and Gathered Twigs on the Scents of Fall Stencils 360°™. I used the same kraft cardstock for my cardbase.
That concludes our inspirations for today! I hope you enjoyed today’s intros. If you haven’t done so, head over to our Day 1 Intro and participate in our GIVEAWAY! In this Fall 2020 New Release & Inspirational Chapter, we are hosting 2 SEPARATE GIVEAWAYS, one on our Blog and the other on our Instagram page(@penguinpalacestamps)!We will randomly pick out FOUR lucky winners, two from IG and two from our blog, each will receive a $30CAD Gift Certificate to our shop!
You have until 12 Sep 9:00pm PST to enter. We really hope you will play along with us! Winners will be announced on our Blog and on Instagram on 13 Sep!
Don’t forget to check out our Intro Video with step by step instructions on how to use our new Stencils 360°™! And be sure to visit us again tomorrow for more wonderful projects!
Thank you so much for stopping by. Have a lovely day!
Hello and welcome back to Day 2 of our Reveal & Inspirational Chapter. Our new Fall Release is NOWAVAILABLE for Pre-Order at www.ppstamps.com! YAYYY!!!!! During this Pre-Order period, you will automatically receivea 16″ x 16″ FREE frosted zipper bag when you purchase our Stencils 360°™ Starter Kit! This frosted zipper bag is the perfect storage solution for your Stencils 360°™! So take advantage of this awesome deal which will only last until 17 Sep 11:30pm PST!
Get a FREE 16″x16″ Frosted Zipper Bag – During Pre-Order Period Only!
Visit our blog this week for some fun and awesome projects from myself and our talented Creative Team. Today we have 3 more stencils to showcase so let’s get to it! All of these work in conjunction with our Stencils 360°™. If you missed our Day 1 Intro, click HERE to read more about out this innovative tool or watch our Intro Video HERE!
First up for today is the Magical Fireworks Stencils 360°™. This set is great for creating greeting cards for various occasions! It contains two 6″ barrels. Use them separately or together! They also coordinates with the Warmest Wishes stamp set (to be showcased later this week), greeting orbs in which fit perfectly into the centre space of this stencil design!
Magical Fireworks Stencils 360°™
Ashley made for us a trio of cards! She demonstrated perfectly how the stencils can be used together OR separately. I love that she chose different colours of cardstock to get the different themes. In these cards, she used various colours of Distress Oxide inks for blending.
For the 1:1 card, a piece of 4 3/4″ by 4 3/4″ cardstock was used for the blending, and both Barrels of the stencil set were used. I love the pink heat embossed image in the middle which is from our new Warmest Wishes stamp set.
For the tan-coloured card, a 4 1/4″ by 5 1/2″ panel of Neenah Desert Storm cardstock was used for the blending. She only used Barrel 2 of the stencil set this time and she chose a turning interval of 45°. This gives the card a nice clean composition. I love the gold shimmer on the kraft cardstock.
For the navy card below, a 4 1/4″ by 5 1/2″ panel of navy cardstock was used. This time she only took Barrel 1 and followed the recommended turning interval of 15° for blending. I love the gold ink she used for her stamped image. The sparkly embellishments finish off the card to perfection!
In the next example, I wanted to make a card that is full of colors and energy! I used both Barrels from this set.
I used a turning intervals of 22.5° with Barrel 1, and 30° with Barrel 2. These patterns form a fantastic overlay effect which I really like! The centre stamped image is from our new Warmest Wishes stamp set. This image fits perfectly in the centre space. I really love how this stencil mimics beautiful fireworks and hence where it got its name!
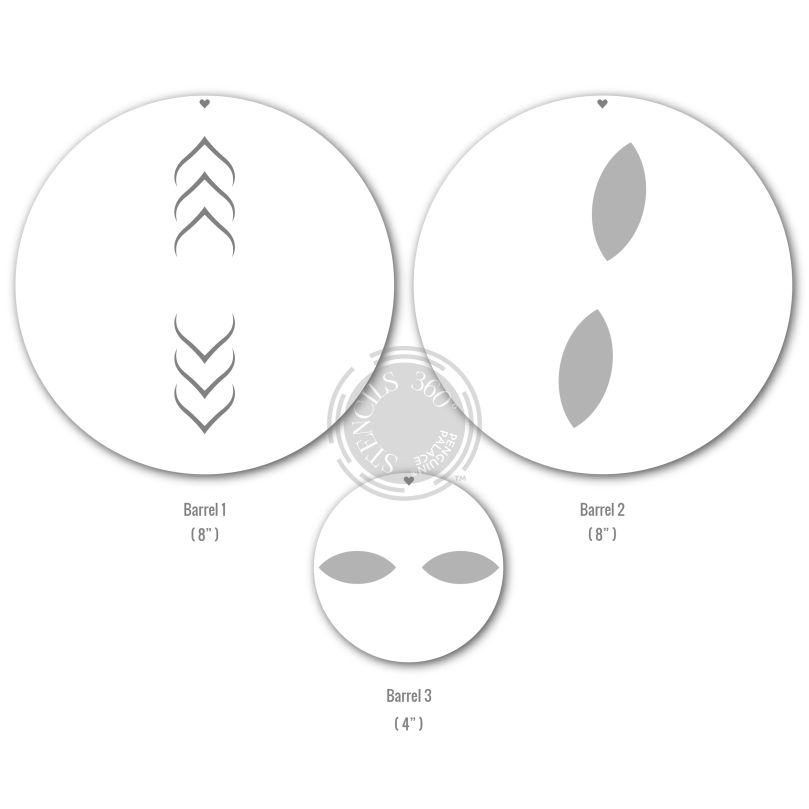
Next up is the Sacred Lotus Stencils 360°™. This set of stencils is the first of our Multi-Barrel™ series. This set comes in 3 pieces, comprising of two 8″ stencils and a 4″ stencil.
Sacred Lotus Stencils 360°™
If you like floral designs, you will sure enjoy playing with this set! This set is super versatile as you can mix n’ match the barrels to get totally different looks!
First we have Anja’s pair of creations. She used Neenah Desert Storm cardstock for blending on both of her cards. Using Barrel 1, she chose a turning interval of 22.5° and ink blended alternating colors with Milled Lavender and Dusted Concord Distress Oxide Ink.
Then with Barrel 2, she blended alternating colors with Shaded Lilac and Dusted Concord Distress Oxide Ink, also with a turning interval of 22.5°. Finally, she ink blended Shaded Lilac on Barrel 3, again with the same turning interval.
I love her idea of cutting her card into 2 pieces to make 2 slimline cards – how clever! She used sentiments “Thinking of You” from Warmest Wishes and “Stay Strong” from Heartfelt Notes. I just love the bold white heat embossed letters.
For the last example featuring the Sacred Lotus Stencils 360°™, I combined Twisted Citron and Squeezed Lemonade on Barrel 1. I then used Shaded Lilac on Barrel 2, and Spun Sugar Barrel 3. I chose a turning interval of 22.5° for the whole of my blending process.
I thought this heart warming sentiment from Heartfelt Notes is a perfect match to this feminine card.
First we have Jo’s card. I just love how bright and vibrant this card is! She followed the alignment marker on this stencil and used a turning interval of 15°. I love how she used the bright yellow to create a beautiful ray of sunshine giving the card so much energy! The cyan blending at the back of this also pops up nicely!
Then she chose the sentiment “Hello Sunshine” from Words From The Heart (Chapter 2) stamp set and die cut it using its coordinating dies. She also stamped and colored some cute images from Summer Sunshine to complete her card! What a flawless combination – love it!
For this next card, I used a turning interval of 15°, ie. inking by making references to the ‘square’ symbols on The Base™. I chose a combination of 4 colors, and added an image from Warmest Wishes. Even though the blended shapes are spaced so closed together, not once did I need to do any masking for the multi-color blending. And it took me very little time to complete this card. I really love how it turned out.
On my next card will show you how the one stencil can offer different looks. I did a portrait orientation for this card instead of going 1:1. For this card, I increased the turning interval to 22.5° instead of using the recommended 15°. By doing this, I am actually making the geometric pattern less condensed.
I combined Twisted Citron and Squeezed Lemonade, and completed just 2 rounds of inking by first making reference to the solid hearts with one color, and then to the hollow ones with the other color. Super simple to do! I then added a shadow die cut “Never Lose Hope“, a stand-alone die which we will showcase a little later this week. Finally I used matching-color enamel dots to finish off this card.
The centre stamped image is from the new Words From The Heart (Chapter 1) stamp set. I die cut this using the coordinating dies and adhered that with foam tape to finish off this clean and simple card.
That concludes our inspirations for today! I think you’ll agree that simple stencils make wonders! If you haven’t done so, head over to our Day 1 Intro and participate in our GIVEAWAY! In this Fall 2020 New Release & Inspirational Chapter, we are hosting 2 SEPARATE GIVEAWAYS, one on our Blog and the other on our Instagram page(@penguinpalacestamps)!We will randomly pick out FOUR lucky winners, two from IG and two from our blog, each will receive a $30CAD Gift Certificate to our shop!
You have until 12 Sep 9:00pm PST to enter. We really hope you will play along with us! Winners will be announced on our Blog and on Instagram on 13 Sep!
I hope you find today’s cards inspiring. Don’t forget to check out our Intro Video with step by step instructions on how to use our new Stencils 360°™!
We will continue to have lots of wonderful products and projects to showcase this week so be sure to visit us again! Thank you so much for stopping by. Have a lovely day!
Hello crafty friends! Welcome to our Fall 2020 New Release Reveal & Inspirational Chapter! Today is Day 1 and this is also our Giveaway Post! Our new Fall Release is NOWAVAILABLE for Pre-Order at www.ppstamps.com! YAYYY!!!!! During this Pre-Order period, you will automatically receivea 16″ x 16″ FREE frosted zipper bag when you purchase our……. drum roll please…….Stencils 360°™ Starter Kit! This frosted zipper bag is the perfect storage solution for your Stencils 360°™! So take advantage of this awesome deal which will only last until 17 Sep 11:30pm PST!
Get a FREE 16″x16″ Frosted Zipper Bag – During Pre-Order Period Only!
Visit our blog this week (9 Sep to 13 Sep) for some fun and awesome projects from myself and our talented Creative Team. Most importantly, continue reading for a chance to win some prizes! Starting today we will be showcasing our ALL NEW innovative tool, the Stencils 360°™, 11 new stencil sets, 4 new stamp sets & coordinating dies, and 2 new stand-alone dies!
Now let’s jump right in! I’m just super excited to finally introduce this new set of tools to the crafting community! These tools are perfect for creating the most gorgeous geometric patterns and overlays in just matter of minutes!
Here’s a look at this new Stencils 360°™. This system includes The Base™, 3 Guide Rings™ (sizes 8″, 6″ and 4″ in diameter), and 6 pieces of Paper Positioners (7 1/2″, 7″, 6″, 4 3/4″, 4″, 4 1/4″ x 5 1/2″).
This new set of tools allow you to create with circular stencils for the first time ever!! With Stencils 360°™, it is now possible to create special layering effects, and achieve variations of beautiful backgrounds with just a single stencil!
Moreover, create attractive multi-colour stenciled backgrounds and even wreaths in the least amount of time! In the past, if you wanted to ink blend a certain element or certain areas of a stencil, you would need to do some tracing and or masking . But with our new tool, this won’t be necessary! Check out our Intro Video with step by step instructions on how to use this tool! I promise you are going to love it!
This set of tools come in a Starter Kit, in combination with the Waterspout Stencils 360°™ which will be showcased later this week, and the new Adhesive Eraser!
Stencils 360°™ Starter Kit
This Adhesive Eraser is the perfect tool for removing adhesive residue and is a super handy tool to have in your craft stash. Best of all it comes in hot pink!
Aside from Intro to our Stencils 360°™ Starter Kit, today we’ll also be focusing on three new stencils from this release. First up is the Summer Blossom Stencils 360°™.
Summer Blossom Stencils 360°™
Combined with the Stencils 360°™, this 8″ stencil helps you creates the most stunning floral background in the shortest time!
The overlaid geometric patterns in this card were created by rotating the stencil at 30° turning intervals during the ink blending process. I created this trio-toned card using Tumbled Glass, Peacock Feathers, and Hickory Smoke Distress Oxide Inks. The image in the centre is from one of our new stamp sets, which will be showcased later this week.
In the next example, I used the 6″ Paper Positioner with a 6″x6″ cardstock. I also used a turning interval of 30° on this card.
Using Picked Raspberry, I blend while referencing to the solid circles; cleaned my stencil just once; then using Wilted Violet, I made reference to the hollow circles while blending. It’s that simple!
In the below example, I rotated the stencil at 45° turning intervals. As you can see, the smaller the turning interval, the fuller and more complex the overlays get. and vice versa.
This card was done on a 4 3/4″ cardstock and you can already see the different look that the same stencil gives.
This set is part of the Double-Barrel™ Series, as each pack contains 2 stencils, an 8″ and a 4″. These stencils can be used together or separately. Compared to the Summer Blossom, this set creates a much larger floral pattern. This 8″ stencil gives a much bigger creative space in the middle. In the card below, this centre space was decorated using the smaller 4″ barrel, which is the perfect extension to the 8″ barrel to create more intricate details.
I used a stamp image from our new release and die cut it using its coordinating stitched scalloped die which we’ll showcase later this week. You can also mix the 8″ barrel with another 4″ barrel from a different set to create a totally different look.
As you can see in the photo below, this set is also great for home décor! If you love decorating your home with handmade arts, you’ll definitely enjoy this set!
Most of us have built wreaths before using stamps which is lots of fun. But have you tried to build a wreath using a single stencil? My guess would be no. But if you have, it would have taken you much needed time for the tracing and masking in the past.
Now GIVEAWAY time! In this Fall 2020 New Release & Inspirational Chapter, we are having 2 SEPARATE GIVEAWAYS, one on our Blog and the other on our Instagram page!
Blog Giveaway:
Each of you will have at most 5 chances to enter onTHIS post. Feel free to do all 5 to maximize your chance of winning! (ie. if you do all 5, you will have 5 different comments here on THISpost)!
Subscribe to our YouTube Channel and leave a comment on this blog post!
Like our Facebook page and leave another comment on this blog post.
Follow us on Pinterest and leave another comment on this blog post.
Subscribe to our Newsletter (at the bottom of our store’s home page) and leave another comment on this blog post.
Follow our Blog and leave another comment on this blog post.
For this Blog Giveaway, we will randomly pick out TWO lucky winners, each will receivea $30CAD Gift Certificate.
Instagram Giveaway:
Hop over to our Instagram page (@penguinpalacestamps) and look for the Fall 2020 New Release Reveal & Inspirational Chapter Day 1 Giveaway Post, follow the directions on that post for a chance to win!
For the Instagram Giveaway, we will randomly pick out TWO lucky winners, each will receive a $30CAD Gift Certificate.
You have until 12 Sep 9:00pm PST to enter. We really hope you will play along with us! Winners will be announced on our Blog and on Instagram on 13 Sep!
I truly hope you’ve enjoyed today’s reveal and inspiration! With our new tools and our new lines of stencils, you will be able to achieve design variations with a single stencil. You can also mix and match stencils to create totally different designs. Talk about making the most out of stencils! Just imagine the possibilities! Best of all, it is super FUN to play with!!
We will continue to have lots of wonderful products and projects to showcase this week so don’t forget to visit us again! Thank you so much for stopping by. Have a lovely day!